
Welcome, friend. I started journaling in September 2017 and have never left the practice since. I have taken breaks, captured the passing of the days in hundreds of different ways but I always return to this. My journal is my go to guide. Friends ask me how I manage a full time job with reading, blogging, Instagram and any number of ideas I am working on. My simple answer is my journal. Specifically it is the one page where I lay out what’s happening during the week. Today, I will walk you through my weekly planning routine, how I create this page at the start of a new week and all that it contains to get me ready for a fantastic week.
Whether you’re a seasoned journal keeper or a curious novice, I hope this article demystifies the art of planning and we can explore and share what works for us. Over the next few paragraphs, I’ll unveil the six steps that shape my weekly planning routine. You can plan along with me or just read first, whatever works.
Pro Tip: If you are going to try this with me, I encourage you to just use a piece of paper, not in your journal. You are not committing to a system, you are trying it out. Keep this as low stakes as possible for yourself. My first attempt at a bullet journal was a sticky note.
Weekly Planning
All the steps I share below are how I create my week. There are 6 steps in total. It can take me over the course of two days sometimes to put this together. I do this over multiple sittings and love returning to them. To me, this has become the way to not only manage time but also find joy in the process. I hope there is something insightful for you here.
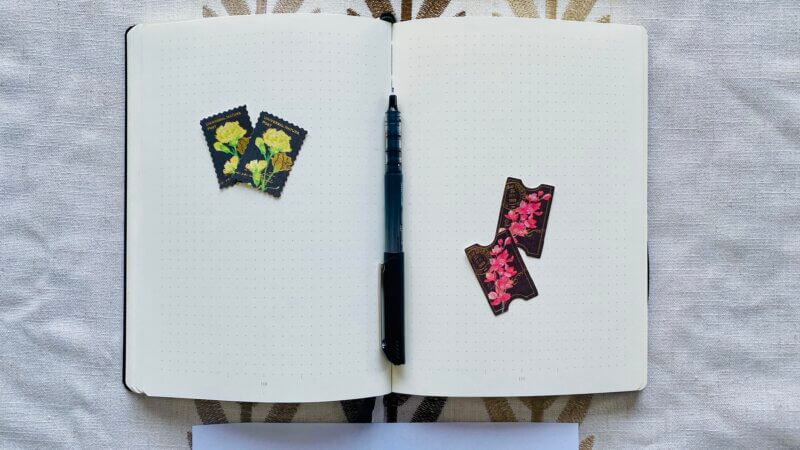
Step 1: Gather the supplies for the weekly planning.
If this is your first time, it’s ok if I take a few tries to get everything. I need my journal, pens, a ruler, stickers, and my phone. I like to find two blank pages facing each other. This is the spot I will bookmark to return to through the week. If you are using a blank sheet of paper, divide it into two halves.
Pro Tip: Make a list of all that you are using as you go.
Step 2: Create the basic layout.
Pro Tip: Think of this as the template you will fill out every week.
Choose one side as your weekly side (this you will update through the week) and the other side as your “reminders” side.
- I am right handed and prefer to write on the right page so that is where I create a grid with at least 7 cells, one for each day. I use any extra space for art, a doodle, and some stickers… whatever I am feeling like.
- On the other page, I need four cells: a big one and three small ones. I usually make more to create space for embellishments, quotes, etc. I label the small cells as easy goals, middle goals, song of the week (adapt as per your mood). The big cell is for truths. More on that in a bit.
Here is what the pages of my journal look like:
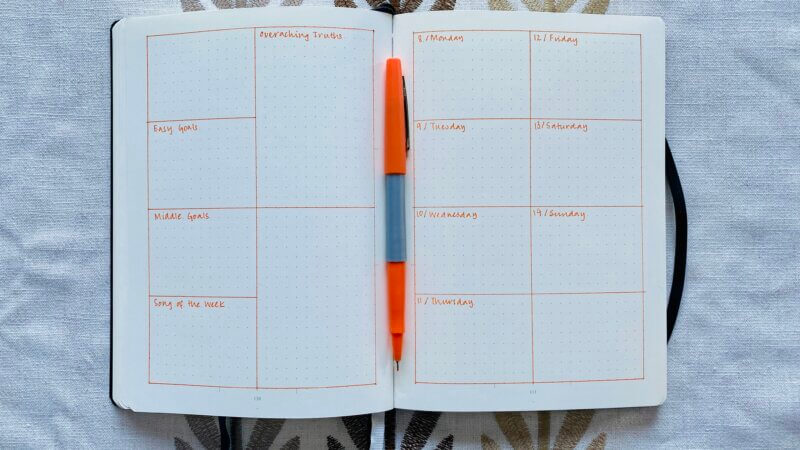
I sometimes free hand draw this but nowadays I am enjoying straight lines. Rulers take me back to school days.
Step 3: Answer: What’s happening this week?
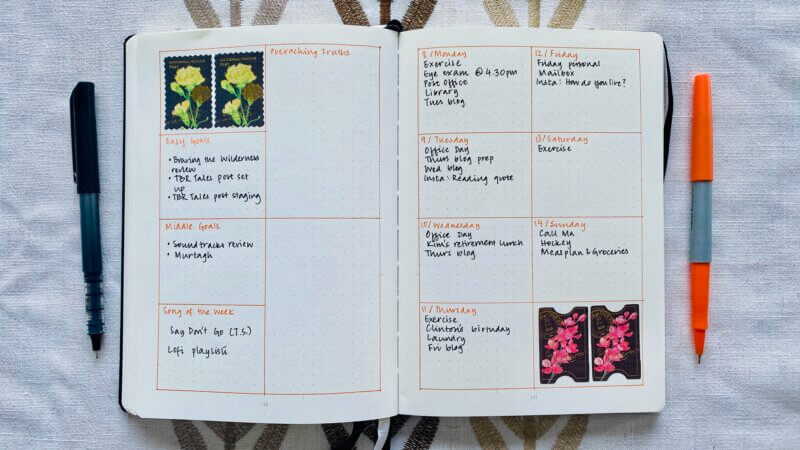
I start at the weekly grid: Add in all the appointments/must-do tasks to each day of the week. I refer to my calendar for scheduled events. I like to do laundry on Thursdays so that goes into my Thursday cell. I mark out office days, exercise days, anything and everything I foresee myself definitely doing.
Step 4: Answer: What have I been working on?
Next, I move to the reminders page. My intention for this page is for it to be a guide for the free time I see in my week as well as a cozy spot for whatever I want to return to. I create a few lists in the cells:
- Easy Goals – These are 3-4 things that will take me less than an hour to do.
- Middle Goals – These are big items that I am working on and will take me a few weeks to complete. I limit these to two at maximum.
The terminology for easy and middle goals comes from Jon Acuff’s All It Takes is A Goal.
On a more personal level,
- I am currently tracking a song I am loving singing along to in one cell. Listening to music is a great way to relax and I want to do more of that so why not remind myself of a song I like? Apart from music, I often turn to taking a shower, playing with the cats, watching TV, playing a game, cleaning the kitchen or my room. Pro Tip: I recommend choosing something which is quick, easy to do and only takes a few minutes to recharge you.
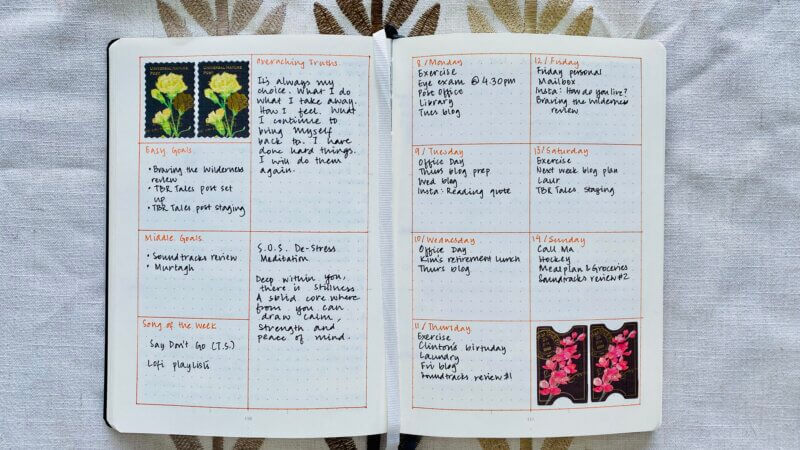
- The longest section on this page I leave to ‘my overarching truths’. Choose whatever thought you wish to return to. Sometimes, it’s hard to decide. I recommend leaving that spot open and moving on to the next step if you feel stuck, or just write anything. This is your journal. Your page. It’s for you. No one is coming looking, judging, asking.
Step 5: Slot the tasks for the goals into the week grid.
The easy goals would take about an hour maximum, while for the middle goals, I might venture to do multiple sittings through the week or add a note for something I need to do, no time in mind. Before adding the tasks to my weekly grid, I find it helpful to look at my routine template. I look to my empty spots (in grey) as pockets of time to fill with whatever my top things are. I pencil in where I think I would do something and, in the journal, I add the task under that day. If I might need a second sitting for something, I consider it. Better to estimate more time than less.
I created the routine template based on Workday Warrior (review) and it has been a slowly evolving masterpiece since March 2023. I have seen different versions of it come up in a few books, including Make Time (review). That is why I call it a template. I have a digital copy that I can tweak and a hard copy to write in.
The idea is to make sure I block off time. I usually end up using the time I set out, but on more unstructured days like on the weekends, knowing that I wanted to spend an hour on something is all I need. Putting it at the specified time assigned 5 days ago is just for the sake of setting an intention. Who knows what the day will actually be like to follow through?
Are there times during the week where you feel most energized? Over the course of the year of this practice, 4 pm on Mondays (after work) and 6.30 am on Fridays morning are the times when I return to my most important personal tasks. It can be scheduling the blog, editing an article, writing a review… I love the uninterrupted half an hour that has the potential to grow into more. A guaranteed period of time that I look forward to arriving at.
Step 6: Weekly planning completed. Celebrate your win!
Add any decorations and embellishments. I sometimes do this as I go, other times at the end.
You have done it! You have an idea of what the week looks like and what you want to do. You had a go-to page to refer to anytime. Everything you need to know is right here.
Pro Tip: Take a few minutes to look at your work. How do you feel? Which days are open? Which ones will need some more gentleness from yourself?
You are prepared.
Now it’s time to start living.

Rome was not built in a day and neither will this system feel comfortable the first time. I am always tweaking what I do but I have found this framework has remained the same over the years, even if the tools I use change. Whether it is a physical planner or a digital journal, a sticky note to my desk, texting with myself to keep reminders or Google Calendar, what matters is a set place that I return to (From Chaos to Creativity (review) reminded this).
Thank you for taking a look at how I get ready for a week. Here are a few insights into how I use this plan through the week.
Using the Weekly Plan
Through the week, I update the 7 day grid with what happened. I use bullet journal’s migration techniques to move items to new days if I am unable to get to them. This grid is the ultimate truth of what transpired.
As things come up for the future, I add events to my Google Calendar. I add things I want to do but haven’t decided when with a ‘T’ (for task) in my journal. These Ts help in my easy and middle goals. Sometimes, I will add them to my calendar because I know I will refer to it when I do next week’s planning.
Find your go-to places to capture ideas. Use the beginning of the week to look through them. I promise, it will make a difference. You will go from wanting to do so much and not knowing where to start to getting it done, a little at a time.
Getting older has made me realize that we get so used to doing things that we forget how we even do them. They become our second nature but when times are tough, we need a way to walk us back to the things we enjoyed and how we used to do them. This routine has been years in the making and I never want to forget it. I wanted a guide for myself to capture what I enjoy and I wanted to share it to get your insights too. I am excited to return to this step by step instruction.
Now it is your turn: What does your weekly planning routine look like? Does it feature a journal? Do you use a calendar or have an app where you track everything? Do we have some steps in common? I want to hear from you! 🙂
Want to see some other photos of my journal? Check out the bookblogger’s guide to bullet journalling. Check out MMMstationery for stickers!
Be First to Comment